Custom Label Ideas for Parties, Home Brew, Wine Making, & Events: From BottleYourBrand

Personalized Stickers, Labels And More For Any Occasion!

  • WEDDING
  • FOOD + BEVERAGE
  • WINE LABELS
  • BEER LABELS
  • CUSTOM BOTTLED WATER
  • MAKE YOUR OWN

Archives for May 2014

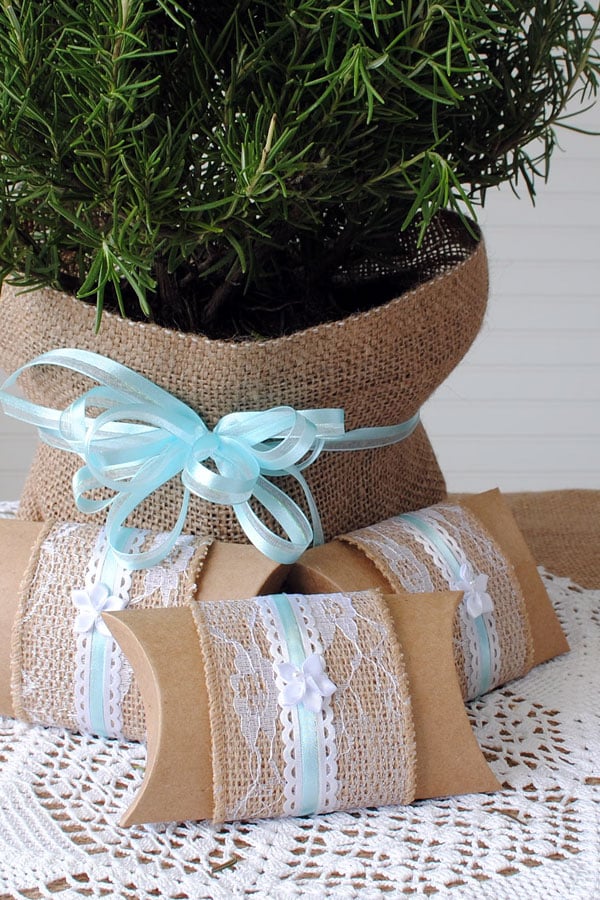
Burlap and Lace Party Favors – Three DIY Projects

May 29, 2014 by Cindy Springer Leave a Comment

Burlap and lace are a mix of rustic country and city chic. I like the rough texture of the burlap juxtaposed with the delicate lace. If you”re as crazy for this theme as I am you’ll want to make these featured party favors. The only tools you’ll need are a ruler, iron, hot glue gun and scissors. Read on to see  how to make these favors and discover some other favors made with labels in the same theme.

Make these burlap and lace theme party favors.

Lace and Burlap Envelope

The first favor we feature is a lace and burlap envelope to hold seed packets. The burlap envelope is secured by sliding the lace band over the flap.

Step by step instructions show how to make this burlap envelope.

Start by using spray starch or sizing to smooth out the burlap. Iron flat.

Use spray starch and an iron to prepare the burlap.

Next make a template. Use tag board or tissue paper. This envelope pattern is 5.5 inches wide and 12 inches long. Adapt your envelope size to meet your needs.

Some of the supplies to make a burlap envelope. No sewing needed.

Fold each long edge over 1/2 inch and press.

Fold over the edges 1/2 inch.

Measure five inches and fold over lengthwise, then press. Hot glue along the seams and carefully press down to create the pouch portion of the envelope.

Measure the envelope and fold over.

Next, fold over the top flap and press down. Do not glue the top flap of the envelope.

Fold over the flap and iron.

Take the lace and measure a length around the top of the envelope. Leave enough lace to fold over the end and cut. Glue the ends to form a circle. Make a small bow from lace and hot glue to the middle of the circle opposite the glued seam. Insert seed packet and fold flap over. Slide lace band over the flap and you’re done!

The steps to making the closure for the burlap envelope.

Put seed packets in your burlap envelope for party favors.

 Mini Clay Pot Favor

This adorable live favor is made with two inch clay pots,  a mini basket, lace and burlap. We used a mini fern, but herbs, tree seedlings or any small plant will work.

Mini potted plant party favor made with cotton lace and burlap square.

These are the supplies we used. The wire baskets are actually sugar/sweetener  packet holders. These were purchased at TJMaxx. Small woven baskets like these work too.

Mini wire baskets and two inch clay pots

The pencils were placed in these photos to show you the scale of the baskets and pots.

Lace edging for clay pot favors

Shop for lace at your local craft store. This lace is from Hobby Lobby. Cut and hot glue a length around the top of the pot. Be careful not to glue your finger!  Cut a 4 inch by 4 inch square of burlap and  place inside the basket. Next, thread lace around the top of the basket and tie a bow on one side.

Mini clay pot party favors

The clay pot is ready for planting. Adorable!

Burlap and Lace Favor Box

The final DIY favor is a pillow box embellished with burlap and lace ribbons. These boxes are great for candies or small edible favors, even seed packages.

Pillow box wedding favors with burlap and lace.

These are the materials you’ll need to make this favor: a spool of burlap/lace 2.5″ wide, pillow boxes in natural kraft brown, narrow ribbons of choice and tiny flowers for the embellishment. By far this is one of the easiest favors I’ve ever put together. Lure a few friends with a good bottle of wine, sit down and watch your favorite movie while you make these boxes. They’re that easy to make!

Supplies to make burlap and lace favor box

Fold the ends of the pillow boxes in so the box is no longer flat. Measure the burlap/lace ribbon around the pillow box and overlap one edge. Glue firmly on the ‘back’ side. Do the same with the other ribbons, layering from widest to narrowest on top. Finish off with  a dab of hot glue to hold the flower in place.

More DIY Favor Ideas

Custom hang tags are versatile favors to tie on boxes, bottles, and bags. The one featured in the photo below has a special message from a bride and groom.

Hang tag for seed packet favors.

I promised some additional burlap and lace favors at the beginning of this post. Aren’t these wedding water bottle labels delightful? Find and customize your water bottle labels with this design here.

Burlap and Lace wedding water bottle labels.

Include the matching wine label to complete your wedding favor ensemble.

Wine label "Burlap & Lace"

Our DIY projects for parties are almost always user friendly! We want you to have fun party planning. If you have questions please feel free to contact us at [email protected]

Filed Under: Craft Ideas Tagged With: burlap and lace envelope, lace and burlap favors, wedding favor seed packet

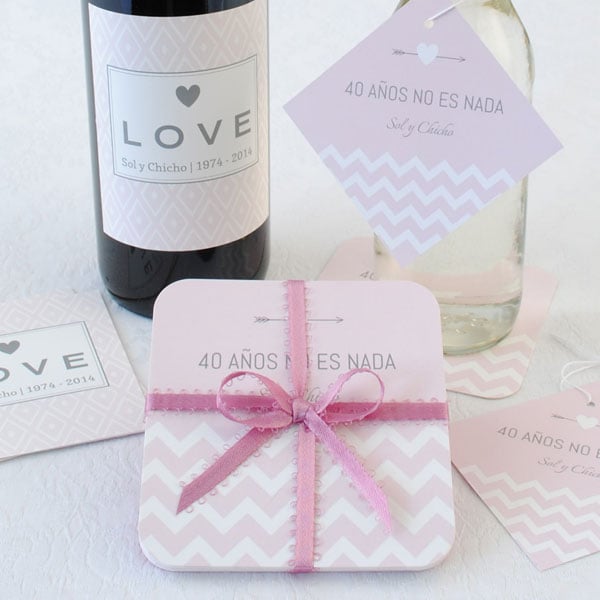
Coordinate Your DIY Party Favors Like a Party Planner – Here’s How

May 22, 2014 by Cindy Springer Leave a Comment

Between Pinterest and Martha Stewart it can be tough not to feel inadequate when party planning. If your palms sweat and your heart races at the thought of hosting an event, then have no fear, this post is full of  ideas to help. Many of us live busy lives, and with work, family and everything else thrown at us daily, there’s little time left to fuss with creating elaborate party favors. Relax! We make it easy for you with one-stop shopping for your custom party favors. Whether you’re planning a wedding, bar mitzvah, bachelorette party, birthday or other event, BYB has it all.

Coordinating Custom Party Favors

Here’s how one customer made favors for a Las Vegas Bachelorette Party. In the photo below, the orange take-out box on the left (with the large red bow) has a hang tag tied to the handle. The mini wine bottle from Gallo,  in the center of the photo, was decorated with a 3 inch by 3 inch mini wine label. On the right is a matching orange goodie bag with a 4 inch x 4 inch square sticker. You can do this easily.  This customer used our template called Vegas. Create your party favor stickers and tags online, start from scratch or choose from hundreds of pre-designed templates. Either way, the results will have you wanting to plan your next event right away!

Las Vegas bachelorette party favors.

Start by deciding what favors you’d like to make. For impact choose at least three items, but two will work well.

Select From this List to Make Personalized Favors for Your Party:

  1. Bottle Hang Tags
  2. Wine Labels
  3. Mini-Wine Labels
  4. Beer Labels
  5. Drink Coasters
  6. Water Bottle Labels
  7. Custom Stickers
  8. Custom Bottled Water
  9. Gift Tag Stickers

All of these items are available on Bottle Your Brand and are fully customizable.

Party Favor Ideas

Here are a Few Ideas to Use the Above Personalized Products for Your Next Event:

  • Bottle Hang Tags are great for decorating wine bottles, beer bottles, soda bottles, party goodie bags and more
  •  Wine Labels stick on any bottle of wine you choose for your party. Set a bottle with a custom wine label on every table for part of your centerpiece or dress up the serving bar with customized wine bottles.
  • Mini-wine labels on 187 ML bottles of sparkling wine look amazing. Set one at each place setting or put one in every goodie bag.
  • Beer Labels made with your custom design placed in a tub of ice make a great birthday party favor.
  • Drink coasters coordinated with personalized bottles of wine or beer do double duty as party decor and party favors. Give them away to your guests at the end of the night to remember the event.

The next idea is from an order placed for a Bar Mitzvah. In the photo you can see three favors, but only two products were personalized to make them, a water bottle label and a hang tag. The water bottle labels fit a Dasani 12 oz. bottle and a Jones Soda bottle. The water bottle label is the 8 inch x 2.125 inch size. Custom hang tags have many uses, but for a Bar Mitzvah they work great tied to the handle of treat bags.

Bar Mitzvah party favors with a custom design.Make your own custom stickers and hang tags online with our design studio.

More Favor Ideas

Here are a few more ideas to make it look like you hired a party planner:

  • Use personalized water bottle labels on bottles of water as well as soda bottles, Gatorade and other carbonated drink bottles.
  • Custom stickers decorate gift bags, take out boxes, party favors, food treats and more.
  • Custom bottled water keeps your guests refreshed and hydrated for weddings or any event where there’s drinking and dancing.
  • Gift tag stickers on all your give-aways complete the look of a coordinated event. Whether you use them on candy bags, baked good boxes, treat bags or guest favors.

The photo montage below is the result of a customer’s order for anniversary party favors. See how great drink coasters, wine bottle hang tags, and wine labels look when they’re coordinating? Even more special is the greeting this customer added in Spanish. I’d translate, but I don’t speak Spanish!

Personalized party favors like these are easy to make online.Coordinate your anniversary party favors with one stop shopping at Bottle Your Brand.

Helpful Tip

The only skill you might need to pull off these amazing looks is bow-tying. Here at BYB a few of us took a class called Bows, Bows, Bows at Packaging Specialties.  The class was one time for 90 minutes and the cost was $25. Rachelle is our resident bow expert as you can tell from the photos. There are also videos on YouTube that teach bow tying skills free to anyone who wants to learn.

Don’t be intimidated when your next important party rolls around. Simply surf over to BottleYourBrand and design coordinating party favors. It’s easy and fun. Should you need help simply hit us up on Live Chat or email us at [email protected] We’re here to help.

Filed Under: Party Favors Tagged With: custom stickers, Party Favors, party planning

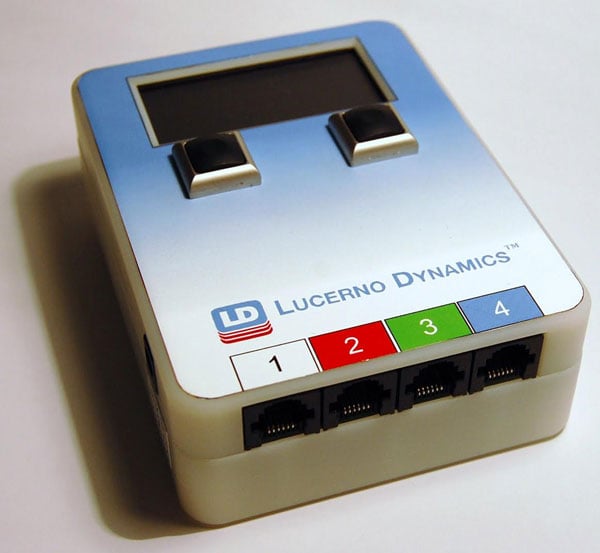
Make a Technical Sticker or Safety Label Like a Pro

May 15, 2014 by Cindy Springer Leave a Comment

Labeling doesn’t always involve bottles, parties or fun times. There are circumstances when a business needs labels or stickers for safety or technical applications. While making wine and beer labels is cool, labels for safety warnings, technical specs, chemicals or product details are a necessary part of doing business for many companies. Standard warning labels may be available pre-made, but what if you need to follow definite OSHA guidelines or meet ISO standards? You can’t always find the exact ready-made label or sticker online. Whatever your needs might be there’s a way to make it happen using our label design tool.

The material we use for our stickers and labels is perfect for technical applications. It’s a synthetic paper with robust properties. The durability, lifespan and flexibility are first rate. For you and your company this means the label will last. It’s porous, which allows for maximum ink penetration, yet it’s lightweight and flexible. It has waterproof and chemical resistant properties as well and it can also endure harsh temperature extremes. It’s pliable in temperatures from -94°F to 356°F. Unlike other materials it doesn’t become brittle, but maintains its strength and adhesive bond.

Three Ways to Make Your Own Technical Sticker


1.  Edit an Existing Sticker

The first way to make your own sticker is to edit one of the existing designs displayed on our sticker page. This caution sticker for example has text fields below the warning icon that allows you to put your exact warning.

Customizable Caution Sticker

2.  Upload an Artwork File

The second way to make a sticker is to upload your own artwork file that was created in a graphics program. Start at Make Your Own and from the drop down choose Custom Stickers, then choose a shape: circle, square, rectangle, oval. Once you’re on the shape page there’s a drop down menu to choose size: 2 x 3, 2 x 4, 3 x 2, 3 x 4, 4 x 2 , 4 x 3, 4 x 6 and 6 x 4. Next, click Customize It and the design studio opens. On the left side of the canvas locate the link IMAGE. When you click the link look above the canvas. UPLOAD NEW IMAGE appears. Click on this and a window will pop up that allows you to browse your files. Find your sticker file, click open and drag and drop your file to the canvas. Your file should be a JPG or PNG format to load properly.

One of our long time customers Lucerno Dynamics uses Bottle Your Brand stickers for their new medical device. Says Josh Knowland, “We are an early-stage medical device company developing technology to improve cancer care. We are in the development phase and are testing early products in pre-clinical and clinical trials in the US.”

Below are images of the technical stickers Josh made using the online design studio.

Medical device stickers

An example of a 4 x 6 custom sticker made by the customer for their medical device.

Josh continued, “For these prototype devices, Bottle Your Brand labels were a great fit for the following reasons:

1) Ease of service – The website is terrific and makes designing your own label a breeze. We design our labels in the open-source design software Inkscape, then export a high-resolution PNG that can be loaded directly into the website’s layout app. Turn-around time is quick and shipping is fast and affordable.

2) Quality – We shopped around and found that Bottle Your Brand provides terrific labels. As far as custom, low-quantity labels go, we needed fairly large ones (6×4). Additionally, we needed labels that could be cleaned. Bottle Your Brand specializes in water-proof labels, and through our own testing, we’ve determined that the stock, adhesive, and printing are resistant to isopropyl alcohol wipes as well.

3) Cost – The ability to have a custom label printed for $0.99 in small quantities is a huge boon for our project. We don’t want to invest in a large roll of labels at this time, so small orders are perfect.
Our initial product consists of a hand-held electronic device enclosed in a plastic case. A number of sensors plug into this device to record patient data. The hand-held device and each sensor must have a label that can perform well in a hospital environment.”

Lucerno Dynamic’s story is just one of many from customers who find our stickers perfect for their application.

3.  Make Your Own Sticker From Scratch

The third way is to use the design studio to make your own sticker from scratch. Once again follow the steps to select the sticker quantity and shape and click Customize It. Once you get to the blank canvas simply use the tools to make your own warning, safety or technical sticker design. There are tools for adding text, images, clipart, QR codes, lines, and shapes. You have the capability to select your own colors for text, shapes, and background.

Below is another example of a business sticker made by a customer. They needed a very specific technical sticker, but they didn’t need hundreds of them, they only needed ten. Using the design studio, they created a 4 inch by 6 inch sticker online. Notice how white rectangles were added to this sticker where they needed them.

Make Your Own Technical Sticker from Scratch

Make Other Business Labels:


Safety Labels

Different standards have been set for safety labels by the ISO (International Organization for Standardization). ISO is the world’s largest developer of International Standards. To make sure your sticker is compliant to the national or international standards for your situation please refer to their site.

Warning-stickers-danger-stickers-hazard-stickers-electric-shock-stickers

Hazardous Chemical Stickers

OSHA has label guidelines for hazardous chemicals. These are posted online here.

Product Safety Stickers

Only you and your technical staff know exactly what needs to be displayed on your sticker. If you need help with creating it please let us know.

Disabled Stickers

You’ll find a handicap sticker design available on our site. However, you can create a disabled sticker in the size that meets your requirement by choosing from the ‘size’ drop down menu.

Disabled sticker

Labels for Food, Drugs and Cosmetics

The FDA provides a PDF with guidelines for the labeling of medical devices that protects the public health. These requirements are to assure products are used safely and effectively and product claims are not misleading. There are two government acts with compliance guidelines you might need to check if they apply to the product label you’re creating. These are the FD&C Act (The Food, Drug and Cosmetic Act), the FPLA (The Fair Packaging and Labeling Act).

Stickers for Medical Devices

The RCHSA (The Radiation Control for Health and Safety Act) in part refers to medical devices intended for sale to consumers from retail outlets. It was established to make sure these devices are labeled correctly and doesn’t mislead with false claims. The guidelines are also to make the customer aware of any dangers to their health. If your product falls within this category please be sure to refer to the FDA.gov website under Device Regulations or by one of the acts named above.

No Extra Charge for Colors!

Everything you add to your sticker is editable for placement, size and color. This includes the words, shapes, logos or photos you choose to include. The background color is changeable by using the Palette Icon in the BACKGROUND OPTIONS tool. The text color is changeable by using the TEXT OPTIONS tool when the text is selected. There’s no fee for color like on many other label sites. You’re the designer and you choose the color you need.

Save Your Sticker Designs For Free

If the boss gets the final word on how your sticker looks. Create an account and save different versions in your account under MY SAVED IMAGES. When you need his/her approval simply open your account and click on each thumbnail to see an enlarged version. Any changes required are easily made by selecting “EDIT” under a saved design.

Short Run Printing for Stickers

When your need is for a few stickers, not hundreds or thousands, we’ve got the solution. For prototypes or test runs we’ve got the solution. We sell short run stickers in quantities of ten or more.

Need Help?

If you’re not sure how to use the design studio or have a file that you want to have checked out before you upload it, email us at [email protected] We’ll assist you with questions about making our own technical sticker for your business.

Filed Under: How To Tagged With: Business Stickers, Safety Stickers, Technical Stickers

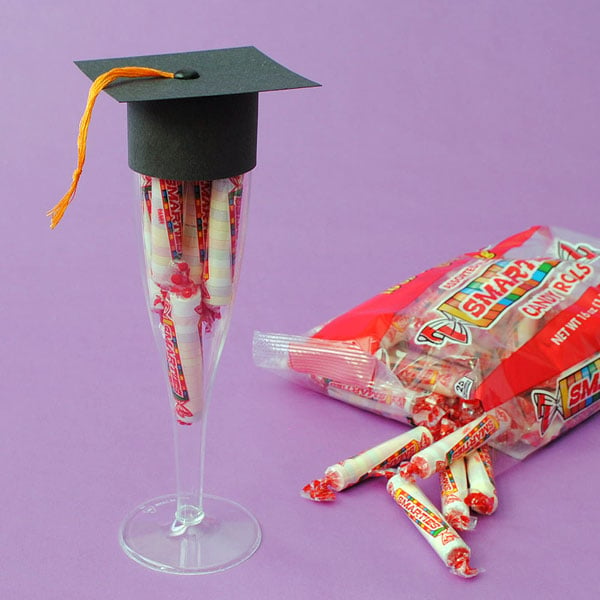
Three Easy Graduation Favors Anyone Can Make

May 8, 2014 by Cindy Springer 5 Comments

With graduation season approaching fast we’re sharing three easy graduation favors anyone can make. If you’ve never claimed to be like Martha, but want a lot of bang for the buck when party-planning, read on. Each favor takes only minutes to make and won’t blow your party budget. We’ve provided step-by-step instructions, photos, and a list of the materials you’ll need to assemble each favor. When possible we provide a source to shop for the materials and include the cost.

#1. Champagne Flute Graduation Favors

Instead of party favor goodie bags check out these party favor Champagne flutes full of candy and topped with a graduation cap. Use school colors for the tassle and the brad fastener for a personalized touch. Since they’re graduation favors we used candies called Smarties. Appropriate for the occasion!

Easy graduation favors anyone can make.

Materials:

Supplies to make the champagne flute graduation favors.

  • Clear Plastic Champagne Flutes – Package of 20 for $9.99 at Party City.
  • Black Poster Board for Top of Mortar Board Hat, buy by the sheet at your local craft store or a 5- pack 22 inch x 28 inch sheets for $6.29 at Office Max.
  • Black Construction Paper for Base of Mortar Board Hat, 50 Sheet Pack for $1.99 at Office Max.
  • Candies of Choice, We used “Smarties Candy Rolls” for the demo favor, $2.99 for a 14 oz. bag.
  • Paper Fasteners or Brads in the color of your choice, We R Memory Makers brand, $3.49 from Ben Franklin store. We used black and white, but they’re available in other colors such as red, orange, yellow green, aqua, blue and purple.
  • Embroidery Floss or crewel embroidery yarn in the color of your choice, $0.99 each JoAnn Fabric & Craft.

Download a printable template for this mortar board topper here.

Mortar Board Cap Top:

Take the poster board and with a ruler measure a 3 inch by 3 inch square. Cut out one square and use it as a template for the rest of the hat tops.

Mortar Board Cap Base:

Use a string or fabric tape measure and measure around the top of the champagne flute. Add 1/2 inch to the measurement. Cut the black construction paper that measurement by 1.25 inches wide and cut two small tabs on the top of one lengthwise side as in the illustration. The size for the champagne flute in the example is 7 inches by 1.25 inches.

Assembly:

Form a circle with the base piece that is just wide enough to slip over the top of the plastic champagne flute and staple the ends together.  The ends should overlap. Fold down the tabs. The tabs are used to glue the base to the top. Now take the 3 inch square and punch a hole in the center.

Cut either colored yard or embroidery thread 4 inches and poke through the hole in the cap top. Secure by putting a paper fastener through the hole and on the underside of the cap top wind around the prongs then open, pinning the yarn against the bottom of the cap.

The top of the mortar board with the tassle and fastener.

This photo illustrates how to attach the tassle to the mortar board cap using a black fastener.

Put a dab of Elmer’s glue on the tabs. With the cap upside down place the glue side of the tabs against the cap top, press down and let dry.

How to glue the base to the cap.

Fill the champagne flutes with Smarties and carefully slip the cap over the top of the flute. Your party favor is ready to go. If you’re serving sparking cider or champagne. Simply pull off the cap, take out the Smarties and serve.

Champagne flute party favors for Graduation.

#2 Mini Wine Labels for Sparkling Cider bottles or Mini Wine Bottles

This favor is pretty simple to create. Shop for mini bottles in either sparkling cider or wine. Measure the label area on the bottles you purchased to see which size mini wine label to order. Sizes available on Bottle Your Brand are 3 ” x 2″, 3″ x 3″, and 2″ x 3″.  Make the mini wine label by customizing a message and uploading a mascot or photo on bottleyourbrand.com

The only part of the process that might be a little inconvenient is soaking off the old labels. This product will help remove any left over glue residue. Once the existing labels are off all you need to do is put the new labels on and you’re done. How simple is that? And they look great!

An easy graduation favor to make is mini wine bottle labels on mini bottles of sparkling cider.
Mini wine labels fit perfectly on Martinelli's Sparkling cider 250 ML bottles.


#3. Wine Hang Tags with a College Mascot or School Logo

To dress up the party table add a custom wine hang tag to the beverage bottles, whether wine, soda pop or beer. The way to create a custom hang tag like this one is to do a search for a large image of the graduate’s school mascot and upload into our design studio. Add your message of congratulations and you’re done. The design studio lets you choose font styles and colors so you can match the school colors of your graduate’s alma mater.

Add a mascot to a wine tag for easy college graduation party favors.

Custom wine hang tags with a team logo make easy graduation favors.
Create your own graduation favors

All three of these favors are easy to make. Order your hang tags and mini wine labels soon. If you need help making a custom design please contact us at [email protected] or Live Chat on weekdays. There are plenty of label ideas you can incorporate into your graduation party. We’re always happy to help.

Filed Under: Graduation Tagged With: DIY Favors, graduation, graduation favors, Party Favors, printable party favor template

Hi! Nice to meet you.

Since the dawn of the internet in 2003 we've been around printing stickers and labels. We're your small family owned business that's passionate about making stickers and labels for all of your events. From weddings to wine makers, DIY crafters to home brewers we've got ideas and inspiration for everyone here on our blog. Got a project that requires stickers or labels? Contact Us and we'd love to help. Cheers! BottleYourBrand

More Sticker & Label Ideas

25 Christmas Wine Label Sayings to Tickle Your Funny Bone

Canvas Printed QR Codes – What are they? Why Your Business Needs One & How to Make One

You’ll Want to See These Funny Mom Life Wine Labels

Animal-Shaped Daycare Stickers Your Kids Will Love

Inspiring Ideas for Pets + Wedding Favors

Die-Cut Logo Stickers – Make Your Own for Products & Promotional Handouts

Just Landed: Our Best Inspirational Stickers

Wedding Menu Ideas – Think Beyond Paper to a Wine Label Menu!

waterproof personalized kids name labels

Personalized Kids Name Stickers – Make Some For Your Kid’s Stuff Now

Dinosaur Party Favor Stickers – Personalize for Your Little Dinosaur Lover

POPULAR POSTS

cute shiba inu phone case sticker
corti hydroflask sticker
qr code sticker for bags

Copyright © 2023 · BottleYourBrand.com