Ideas, Tips and Easy Tutorials to Use Custom Stickers & Labels

Your Source For Stickers & Labels Printed in Small Batches since 2003!

  • WEDDING
  • FOOD + BEVERAGE
  • WINE LABELS
  • BEER LABELS
  • CUSTOM BOTTLED WATER
  • MAKE YOUR OWN

Archives for November 2013

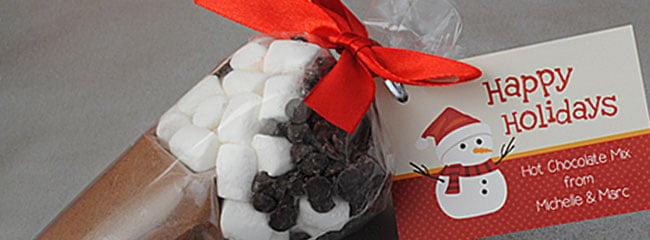
Holiday Gift Idea: Hot Chocolate Mix Cone Bags

November 25, 2013 by Cindy Springer Leave a Comment

During the holiday season we’re showing our readers how simple it is to give food gifts that look amazing but don’t take a lot of time, money or skill. We know how busy everyone is, especially this time of year, so every gift idea is ten steps or less. Each project we present will include a custom sticker. This week we’re showing you how to assemble a hot chocolate mix cone bag.

Hot chocolate mix cone bag with customized gift tag sticker

Making food gifts that friends and family will love is something we all enjoy. Presenting gifts in packaging that makes them drool is another thing entirely. These hot cocoa mix cone bags are perfect gifts. They are so easy to make your kids will want to make some too. They’re great gifts for their friends and inexpensive, but much appreciated gifts for teachers.

Hot chocolate isn’t just for the holidays so consider making this gift for any winter event. This charming presentation of a gift as simple and welcome as hot chocolate, will wow everyone. We’ve included step by step instructions, along with a link to this sticker used in the example.

Materials to assemble a hot chocolate mix cone bag

Materials:

2″ x 3″ custom gift tag sticker

6″ x 12″ clear cone bag (check your local crafts or packaging stores)

1/2″ wide ribbon in the color of your choice

twist ties or thin rubber bands

Single hole punch (optional)

Hot cocoa mix

Bag of mini marshmallows

Bag of white chocolate mini-chips or regular chocolate mini-chips

Directions:

Choose from the variety of holiday designs we offer for Christmas gift tag stickers. Customize and order your gift tag sticker online. Assemble the materials and ingredients in the materials list. When your sticker arrives, usually within a week, you’re ready to assemble this food gift idea.

Pour 3/4 cups of the cocoa mix into a cone bag and seal with a twist tie or rubber band.

Place the filled bag inside a second cone bag and push down to flatten the top.

Cocoa mix cone bag goes inside second cone bag.

Holding the outer bag upright, pour a layer of 1/4 cup of mini chocolate chips on top of the cocoa mix bag.

On top of the chips pour 1/4 cup of mini marshmallows.

Tie off the bag with a twist tie or rubber band.

Use the hole punch to make a hole in the top of your custom gift tag sticker. Tip: Don’t remove the protective backing unless you plan on using our alternate idea which eliminates the hole punch. (See below).

Example of how to punch the hole in your custom gift tag sticker.

Thread the twist tie through the hole.

Thread a twist tie through the hole of the custom gift tag sticker.

Make a shoe lace bow with the 1/4″ ribbon. Using the twist tie attach the gift tag sticker and ribbon to the cone bag.

Alternate idea: If you don’t have a hole punch simply peel away the backing on the sticker and stick it to the cocoa mix bag and tie a bow around the top of the cone bag.

Tie the gift tag sticker to the cone bag

You now have an amazingly simple, but incredibly crafty holiday food gift package.

Filed Under: DIY, Gift Ideas Tagged With: DIY food gift, food gift idea, gift tag stickers

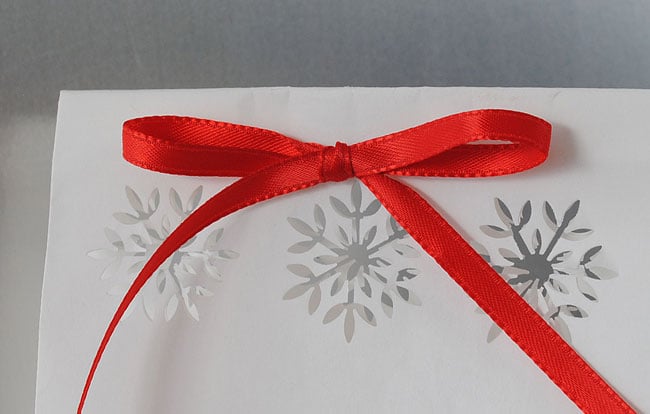
Holiday Craft: DIY Easy Food Gift Package

November 18, 2013 by Jenny Walters Leave a Comment

The team at Bottle Your Brand has been thinking of you and we have come up with a really fresh and easy idea for packaging your holiday food gifts. We’ve been getting a head start on our holiday planning and we wanted to share one of our projects. This is just in time for preparing your holiday gift giving and is so easy anyone can do it. You don’t have to be crafty to pull this one off. It takes about fifteen minutes or less to make a pretty package for homemade cookies or candy.

Snowflake Gift Bag

This Snowflake Cut-Out Bag is made with our Food Label Ginham Food Label, but you can customize any label from our Food Labels or Gift Tag Stickers to adapt to this package. Many of our gift tag sticker templates are new for the 2013 holiday season and besides looking amazing, we think they make personalizing a gift quick and easy.

Easy Holiday Craft - Snowflake Cut-Out Food Package

See how fantastic the snowflakes look in this close-up shot. The resulting snowflake punch outs are just the thing for embellishing a gift card or greeting card.

Close up of snowflake cut outs for holiday food gifts.

One of the tools you’ll need is a snowflake paper punch. It’s an exciting tool that allows you to make the perfect snowflake cut-out every time. We found it for under $8 at a local craft store and it’s also available online. It’s so versatile you’ll find it useful for other craft projects. The cut-outs it creates are delicate and elegant, the perfect touch to make your packaging look like you know a thing or two.

 Materials for holiday craft Snowflake Cut-Out gift package

Other materials you will need:

  1. White or craft paper bag
  2. One-hole punch
  3. 1/4  inch ribbon
  4. Customized label from Bottle Your Brand
  5. Ruler
  6. Pencil

With the paper bag lying flat, fold over at the top to create a flap.

Measure the center of the bag and make a small pencil mark about 1/2 inch below the fold. Measure  one inch on either side of the center and mark with the pencil. With the one-hole punch make a hole on the left and right pencil mark (not the center). This is where you will tie the ribbon.

Next, take the snowflake punch and line up with the center mark you made earlier. Punch a snowflake below the ribbon holes as far in on the bag as the snowflake punch will allow.

Add Snowflake punch holes after the ribbon punch holes.

Now measure from the center snowflake an equal distance on either side and mark with a pencil. This measurement is up to you and will depend on the size bag you are using, but it looks best when the snowflakes are equal distance from each other. Punch a snowflake on both marks. You will now have three snowflakes punched all the way through both sides of the bag.

Hole and Snowflake punch placement for DIY holiday food gift bag
Turn your bag over. Place your custom food label on the bag in the spot that looks best to you.


Place your custom food label on the bag while it is flat and before you fill the bag with cookies.

Fill the bag with your goodies. The last step is to tie the ribbon through the holes and make a shoelace bow.

Pull-ribbon-through-punch-holes-on-DIY-holiday-food-package

Our favorite cookies to fill the bag…

Grandma’s Easy Sugar Cookies

Ingredients:

  • 2 3/4 cups all purpose flour
  • 1 tsp. baking soda
  • 1/2 tsp. baking powder
  • 1 cup butter softened
  • 1 1/2 cups white sugar
  • 1 egg
  • 1 tsp. vanilla extract

Directions:

Preheat oven to 375 degrees F. In a small bowl, stir together flour, baking soda, and baking powder. Set aside.

In a large bowl, cream together the butter and sugar until smooth. Beat in egg and vanilla. Gradually blend in the dry ingredients. Roll rounded teaspoonfuls of dough into balls and place onto ungreased cookie sheets.

Bake 8 to 10 minutes in the preheated oven or until golden brown. We like them on the doughy side so 8 minutes is our fave. Let stand on cookie sheets to cool for two minutes, then move to wire racks.

Decorate with frosting.

Let us know if you have any questions or if you have a favorite food label you’ve made we’d love to see photos.

Filed Under: Craft Ideas Tagged With: custom food labels, DIY Holiday, Holiday Craft

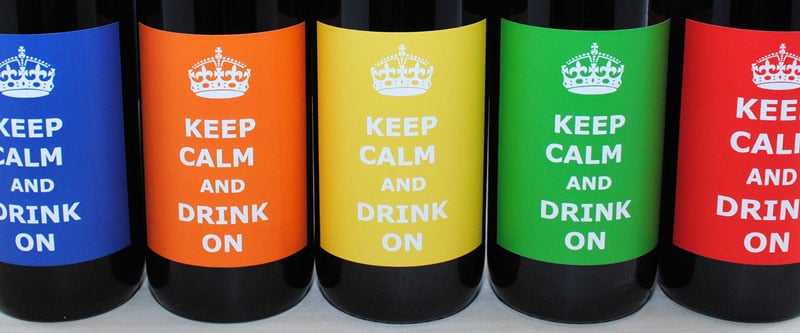
Answers to Commonly Asked Questions About How to Make Your Own Wine Labels

November 11, 2013 by Jenny Walters 3 Comments

DIY Wine Labels

We realize we get asked a lot of the same questions over and over about how to make wine labels. Since we’ve been doing this for almost ten years we thought we’d take a moment to answer the most commonly asked questions. In this post we’ll address making wine labels for personal use. In another post we’ll help you with a more complicated issue which is making wine labels for selling wine. That’s an entirely different matter that involves many steps including government approval.

Where Do I Start?

We frequently get calls from customers asking that question. The average person doesn’t have the time or the inclination to come up with a label design, so we recommend starting with our wine label templates. These templates make it super simple for you by giving you background artwork along with text suggestions. All you need to do is change the text by typing in the words appropriate for your occasion.

Are There Designs for My Occasion?

Most of you are celebrating a special event and that makes it easy to start by choosing the occasion. We have wine labels for Birthdays, Weddings, Baby Showers, Graduation, Holidays, Bachelorette parties, and All Occasions. If you don’t see your occasion, many of our templates are suitable for other occasions by simply changing the text. For example, our wedding wine label templates can also be used for bridal showers. Likewise, our birthday label templates work for retirement celebrations or reunions. Once you’ve looked over all of the templates you’ll understand how easy it is to adapt a background that’s listed under a category and use it for your event. Our categories are merely suggestions for use and are not strictly for use on that occasion only.

What Do I Say On My Label?

We can’t count the number of times we’ve been on the phone with customers who agonize over what to say on a label. Your event is special to you and we get that. Most of our wine label templates already have text on them and by making a name or date change you’ll have the exact right wording. That being said, there’s still some of you who aren’t sure about your message. We’re happy to help you figure it out. We’ve seen tens of thousands of wine labels over the years so we’re pretty good at making helpful suggestions. We often get emails from customers after an event thanking us for our help. Their wine label was the hit of the party and they enjoyed a moment to shine, all because we helped them get it just right. So please, email or call us when you get stuck. That’s what we’re here for.

What About Color Matching?

Next to putting the wrong date on their own wedding label (it happens), nothing seems to get our customers more upset than not getting the right label color. We have to admit this can get tricky if you have your mind set on a perfect hue. Here are some key things you need to know about color and printing wine labels.

Your screen color and your wine label color will not look exactly the same. It’s impossible, and any printer who tells you so is not telling the whole story. Your screen is emitting light which makes everything look brighter. Your screen is also showing color in what is known as RGB. This stands for red, green and blue. These three colors are what make up the spectrum of light coming out of your computer screen. Printing, on the other hand, does not have any light involved. We print in CMYK color. This stands for the four ink colors that are mixed to get the color on your wine label. These colors are C for cyan (blue), M for magenta (red), Y for yellow, and K for black. Mixing the four inks in different percentages results in the colors you see on your wine label. Can you understand how that might get a little complicated? There are various CMYK color charts available on the internet and these might be helpful to you.

The other reason your wine label color may not match exactly to your screen involves the screen itself. Every monitor is calibrated differently. If you’re in an office, check out the same web page on several different monitors and note how the color is different on each screen. Or, if you’re at home, compare the same web page on your PC or Mac screen with a family member’s laptop and you’ll see what we mean. So please keep this information in mind when trying to order an exact match. It’s not a perfect process, but we’ll do our best to help you get as close to your desired color as possible.

Can I Put a Photo on My Wine Label?

Absolutely! For the best results upload a photo that is 300 pixels per inch resolution. This is what you get from your digital camera. Some newer cell phone photos might work, but what never works is a “thumbnail” photo. This is an example photo or meme photo someone may post on a website. These are very tiny images and if you copy and paste them to the design canvas your photo will print like it was caught in a blender. If you have a photo you’d like to use and you’re not sure of the resolution and size, email it to us as an attachment. We’ll open it in a graphics program and check out the resolution and let you know if it will print clearly. We’ll also crop and re-size photos for you if necessary. Just ask!

Photo Wine Label

Can I Use Some Clip Art I Found on the Internet?

That’s a problematic question. If it’s from a free clip art site then most likely yes. The clip art has to be 300 pixels per inch resolution to print clearly. Web pages are 72 pixels per inch resolution so if you copy and paste an image it won’t print clear. Remember we told you that 300 pixels per inch is the resolution that prints clearly. If the image looks blurry on the screen after you’ve uploaded it to the design canvas, then it will print even more blurry. That’s not going to make you happy and most likely we’ll email you to tell you to submit a higher resolution image. If you want to use a cartoon or trademarked character then we don’t recommend that. There are very clear copyright laws regarding using someone else’s image.

Can I Upload a File I Made?

That depends on the program you used to make your label art. WORD documents are not suitable for the simple reason that WORD produces a file that is only 72 pixels per inch resolution. Your label will look blurry. The same holds true for Publisher and PowerPoint. Neither of those programs will give you 300 pixel per inch files. Paint is another problematic program for making wine labels. It too, produces low resolution files. The best graphics programs for making wine label files are InDesign, Illustrator, and Photoshop. Once your file is completed we accept JPG, PSD, PDF, PNG and EPS files for uploading.

What Fonts Can I Use?

We offer over 100 font styles to choose from. The font you choose will set the tone of your wine label. There are many fonts and each one has its own character. Fonts convey messages and have a definite style  including formal, casual, whimsical, playful, bold, delicate, scary, and much more. Compare the two labels below. The same text in a two different font styles makes a completely different impression. So take the time to review our font list and experiment with fonts to make the best wine label possible.
Font Examples on Wine Labels

Will the Wine Label Fit My Bottle?

Our “standard” wine label is 3.5 inches wide by 4 inches high. Since there really isn’t a gold standard for wine labels we chose this size because it fits most bottles. Next time you’re in the wine section at the store glance at a row of wine bottles and you’ll see quickly there really isn’t a fixed wine label size. We do sell other label/sticker sizes under the MAKE YOUR OWN WINE LABELS tab. We have squares, rectangles, circles and ovals. If you need a size other than Bottle Your Brand’s standard, start in this section to create your own unique design.

How Do the Wine Labels Stick to Bottles?

We have to laugh when customers ask us what kind of glue they need to buy for their wine labels. Mainly because we picture how awkward it would be to smear glue on a label and then try to get it to stick to a glass bottle. What a mess that would be! There’s no glue buying involved. Our wine labels come with a self-adhesive backing. The adhesive is specially design to stick under all kinds of conditions including cold, heat and moisture.

How Do I Apply the Labels to Bottles?

Look at the back of your label and you’ll see a seam somewhere, sometimes two seams. Flex the label until the seam cracks open. This is what is known as a “crack and peel” backing. Peel away the protective paper and the adhesive is exposed. Now center your label to the bottle and starting with the center of the label press it against the bottle and smooth from the center out to both sides. It’s quite simple and anyone can do it.

A wine label with crack and peel backing.

Ask Us…We’re Here to Help

When you’re ready to order a custom wine label we’re here to help. Anytime you have a question we’ll do our best to find the answer. We give you the tools to make a label that’s perfect for every event. Should you have questions please email us at [email protected]. We’ll get back to you within 24 hours. Our goal is to bring you the best possible wine label shopping experience.

Filed Under: How To Tagged With: answers about label making, custom wine labels, how to make wine labels, make your own wine labels

Hi! Nice to meet you.

Since the dawn of the internet in 2003 we've been around printing stickers and labels. We're your small family owned business that's passionate about making stickers and labels for all of your events. From weddings to wine makers, DIY crafters to home brewers we've got ideas and inspiration for everyone here on our blog. Got a project that requires stickers or labels? Contact Us and we'd love to help. Cheers! BottleYourBrand

More Sticker & Label Ideas

Team Stickers On A Sheet – Print One Water Bottle Sticker Per Kid

cute shiba inu phone case sticker

Phone Case Stickers – A Simple Guide & A Few Ideas.

corti hydroflask sticker

Hydro Flask Bottles & Stickers: The Ultimate Solution for Hydrating, Customized!

qr code sticker for bags

Put a Sticker on It! Ideas to Transform Boring Promotional Merchandise

Plan the Perfect Simpsons Party with Lots of Donuts Plus that Wonderful Duff

Make Coquito – A Classic Puerto Rican Holiday Drink – With this Recipe

25 Christmas Wine Label Sayings to Tickle Your Funny Bone

Canvas Printed QR Codes – What are they? Why Your Business Needs One & How to Make One

You’ll Want to See These Funny Mom Life Wine Labels

Animal-Shaped Daycare Stickers Your Kids Will Love

POPULAR POSTS

lets get frosted beer label design for Christmas
water bottle stickers
retro bumper stickers
cute maltese puppy sticker
small dropper bottle labels
what label size will fit my bottle?

Copyright © 2023 · BottleYourBrand.com